Building a Display Optical Test Setup: Equipment, Room and Procedures
An optical test setup is not a purchase; it is a capability built around the decisions the product actually needs to make. Buying a laboratory instrument before deciding which measurements matter usually produces a…

An optical test setup is not a purchase; it is a capability built around the decisions the product actually needs to make. Buying a laboratory instrument before deciding which measurements matter usually produces a bench that can do many things and is trusted for none of them.
This article sets out how to decide what to measure, what each stage of capability requires, and when outsourcing is the better answer.
Deciding which measurements you actually need
Two starting points save time: the parameter definitions in reading an LCD datasheet, and the environmental schedule in reliability testing.
Where the measurement is a comparison against a supplier’s figure, the terminology in display specification terms is worth settling first, so the two sides are measuring the same thing.
Start from the decisions. An incoming inspection decision needs a fast, repeatable measurement that separates good lots from bad ones. A development decision needs a more precise measurement that characterises behaviour across conditions. A supplier dispute needs a measurement whose method the other party accepts.
Those three decisions need different things. Incoming inspection values speed and repeatability over absolute accuracy. Development work values range and resolution. Disputes value a documented method, often one that follows a published standard, and sometimes an accredited laboratory rather than your own bench.
Write the list of measurements before buying anything, and for each one note the decision it supports. Measurements that support no decision are the ones that turn into unused equipment.
Room, stray light and reflections
The measurement position should be documented as a drawing, not described in words. Where the display sits, where the instrument sits, where the light source is and what the nearby surfaces look like are all part of the setup, and a sketch of the bench is what allows a second person to rebuild it after a move or a reorganisation.
The room is part of the instrument. Stray light reaching the display raises the dark state and lowers the measured contrast; light reaching the instrument’s aperture changes the reading directly.
Three controls cover most situations: a dark enclosure or curtain around the measurement position, matte surfaces in the room rather than glossy ones, and a defined light source for measurements that must be taken under illumination. Where dark-room contrast is being measured, the enclosure matters more than the room’s general lighting.
Temperature stability is the second environmental factor. Backlight output changes with temperature, and a bench next to a window or an air-conditioning vent will produce readings that drift with the weather rather than the product.
Instrument classes and calibration
Three instrument classes cover display work: a luminance meter for point brightness, a colorimeter for colour at a point, and an imaging colorimeter or spectroradiometer for full-panel measurements.
Whatever is chosen, calibration status is part of the measurement. Record the instrument model, its last calibration date and the source of that calibration with every result. An uncalibrated instrument produces numbers that cannot be compared with a supplier’s, which is exactly the situation an in-house capability is meant to avoid.
Fixtures and repeatable positioning
Most disagreement between two sets of measurements comes from positioning rather than from instruments. A fixture that holds the display and the instrument at defined positions, and that can be re-set reproducibly after being disturbed, is more valuable than a better instrument used by hand.
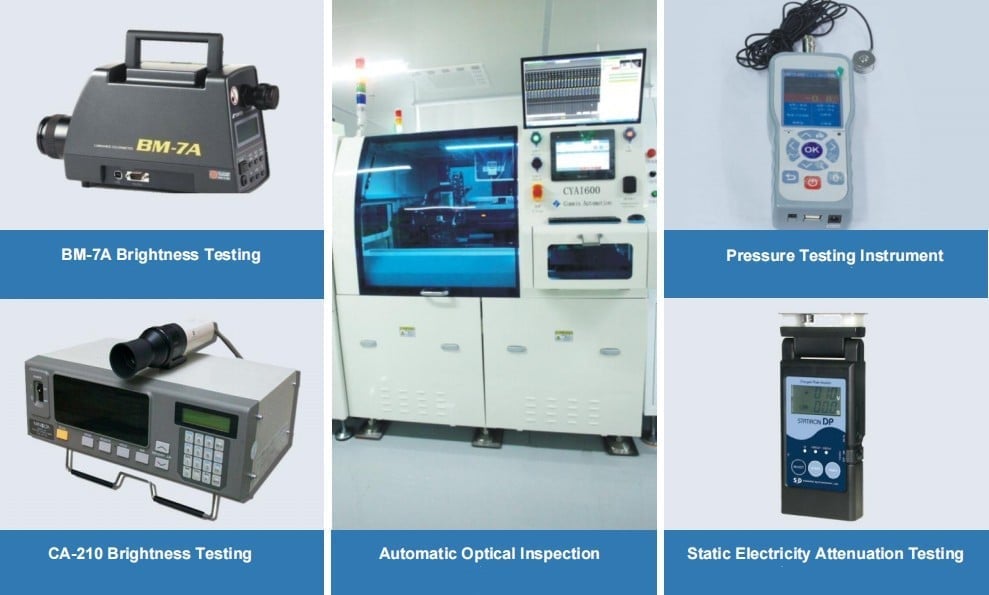
Design the fixture for the measurements on the list: a fixed normal-distance position for centre measurements, a means of positioning the sample at defined points for uniformity, and an adjustable angle for viewing behaviour. Record the fixture’s dimensions with the results so that a later session can reproduce them.
Patterns, sources and standard conditions
Measurements are defined as much by the content as by the instrument. Fix the patterns – full white, full black, grey levels, colour fields – and the conditions under which each is used.
| Measurement | Pattern | Condition |
|---|---|---|
| Centre luminance | Defined white window on black | Dark room, after warm-up |
| Full-screen luminance | Full white | Dark room, after warm-up |
| Contrast ratio | Full white and full black | Dark room |
| Uniformity | Uniform grey or white | Dark room, fixed sampling grid |
| Readability under light | Real interface content | Defined illumination at a defined angle |
Warm-up belongs in this list too. A defined warm-up period, with a defined pattern shown during it, is what makes two sessions comparable.
Procedures that keep results comparable
A procedure is a written sequence that a second person can follow and produce the same numbers. It should state the preparation, the warm-up, the measurement order, the patterns, the acceptance of each reading and what to do if a reading looks wrong.
Two details are often omitted and both matter: the order in which measurements are taken, because a display that has just been driven at full white behaves differently in the next measurement; and the treatment of anomalous readings, because deleting them without a rule is how a bench loses credibility.
Data recording and traceability
Record the sample, the instrument, the conditions, the values and the person who measured. Where a result will support a claim or a specification, keep the raw data rather than only the summary, because the summary is where the conditions disappear.
A simple structure works: one record per measurement session, with the conditions at the top and the values below. Over a year, those records become the evidence base for the product’s own optical behaviour.
Maintenance and recalibration
A reference panel should be treated as an instrument in its own right: stored away from light and heat, handled with the same care as a production unit, and checked against an accredited measurement at long intervals. Its value comes from stability rather than accuracy, since it is used to detect change in the bench rather than to establish absolute values.
The measurements themselves are described in brightness, contrast and uniformity measurement; this article is about building the capability around them. Instruments drift, fixtures move and lamps age. Set a recalibration interval for the instruments and a verification interval for the bench as a whole, using a stable reference – a reference panel kept aside for that purpose is the simplest option.
If the bench measurement of the reference panel drifts beyond a defined tolerance, something has changed in the setup. Finding that before it affects a production decision is the entire point of keeping a reference.
When outsourcing is the better answer
An external laboratory also gives a useful second opinion on your own method. Sending a reference panel to an accredited laboratory once, and comparing the result with your bench measurement, quantifies the difference between the two setups. That single comparison tells you how much confidence to place in routine in-house numbers and when a formal measurement is required.
Three cases favour an external laboratory: measurements that must follow a published standard for a claim or a certification, measurements that need equipment too specialised to justify in-house, and measurements that need to be independent of both parties in a dispute.
The right combination for most companies is a modest in-house bench for routine decisions and a relationship with an accredited laboratory for the cases above. Building the in-house capability first makes the external work easier, because the sample and the question are already well defined.
Staged capability plan
The sequence matters as much as the equipment. A bench that measures one point repeatably, with a written procedure, answers most incoming inspection questions; adding colour and panel-scale measurement later extends it without invalidating the earlier work. Building capability in the other order – instruments first, procedure later – usually produces numbers nobody has agreed how to interpret.
| Stage | What it adds | Decisions it supports |
|---|---|---|
| 1. Bench and fixture | Dark enclosure, fixed positioning, one luminance meter | Incoming inspection of centre brightness |
| 2. Patterns and procedure | Defined patterns, warm-up, written procedure | Comparable measurements between sessions and suppliers |
| 3. Colour capability | Colorimeter or spectroradiometer with calibration | Colour acceptance and supplier matching |
| 4. Panel-scale measurement | Imaging colorimeter or scanning fixture | Uniformity characterisation and defect maps |
| 5. Illuminated and environmental | Defined light source, temperature control | Readability and temperature behaviour |
Each stage is useful on its own, which means the capability can grow with the programme rather than arriving as a capital project. For the measurements themselves, start with mura and luminance uniformity and add the rest as the decisions require them.
Frequently asked questions
Do we need a dark room?
For contrast and uniformity measurements, a controlled dark enclosure around the sample is usually enough. For readability work, a defined light source matters more than the room.
How often should instruments be recalibrated?
Follow the manufacturer’s interval and add an internal verification against a stable reference panel between calibrations.
Is an imaging colorimeter worth the cost?
It becomes worthwhile when you need full-panel uniformity data, defect documentation or comparison across many units. For occasional spot checks, a luminance meter is sufficient.